Since I have so many people wondering why I seem handicapped around a normal keyboard, I though I might as well provide an explanation as to why that is, while cementing myself as the biggest nerd there ever was.
I should first take the time to introduce myself. My name is Emil, I am 25 years old as of writing, and I studied computer science at Aarhus University. Some time ago I decided to seek my fortune as a software consultant, but most importantly I am the keyboard and input-method equivalent of a vegan on steroids.
“In the beginning were the words…”
My self immolating tactile feedback journey begins a few years back, in a 4 story apartment next to the railway station on an island commonly regarded as the nation capital of black metal, and birthplace of some important writer of children’s books. I was in the beginning stages of realizing that coding was life, and was writing code all the time. This was when I first realized I really disliked my keyboard. This was of course your standard issue rubber dome keyboard that came with the computer I owned. I couldn’t tell you the name of the device for my life. At that point it was simply a nameless peripheral to me if its worth was not measured in gigahertz or gigabytes. This was also before I knew touch typing, and I realized I had to teach myself how to do that.
I had this wonderful idea, that since I was starting with a blank slate of knowledge, I might as well to everything the best way possible, without being held down by old habits and outdated doctrine, so that’s what I did. I decided to learn touch typing with the best keyboard layout, on the best keyboard conceivable, with the most functional design possible. What i ended up with was a lot like trying to make the worlds best color by mixing every color out there. Grey goo, a hefty price tag and something reminiscent of a modern piece of avant-garde art.
Conjuring Up An Idea
What I ended up creating, was based on three factors: It needed to have mechanical keys with good tactile feedback; It needed to have a matrix layout, not staggered 1890’s style keys; And it should use the Workman keyboard layout. Since there wasn’t really a keyboard out there that had all of that, I made my own. From the bottom up. Which was a challenge. And a mistake. And a waste of an entire summer vacation.
The Workman Layout
The Workman layout, is a keyboard layout based of Colemak, but with slight changes. If you don’t know what the idea of this is, here is a brief primer: The QWERTY layout we use today, is not optimized, such that the most used keys, are closest to the center of the keyboard, the homerow. Workman and Colemak are optimized such that the keys you use the most, are placed where your fingers are placed.
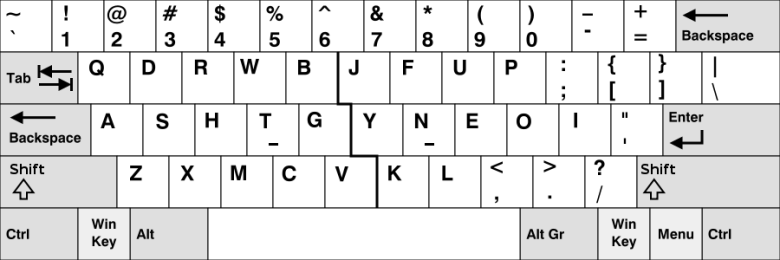
The Staggered Layout Problem
This was more of a nit-picky thing, than a real requirement for a good keyboard. Or so I though. Most keyboard layouts today have the keys placed slightly slanted, much like the picture above, and there is no current day reason to do so. The staggered rows – as it is called – was introduced with the typewriter, because there needed to be space for the metal bars that connected the keys to the letter hammers. It was mostly carried over, as people were used to writing with a staggered layout, and thus they preferred it. I disregarded that as an outdated doctrine and wanted a linear layout instead. Like the one below:
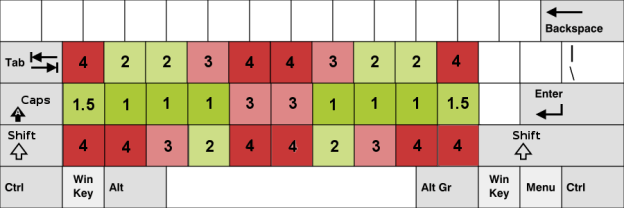
This looks super weird as I’m used to the staggered keys (well was anyways), and at the same time super pleasing to my inner OCD. One would think this was a minor detail in the long run, but comparing to my laptop keyboard, the linear layout is vastly easier to type on.
The Keys
All i needed now was an actual keyboard. Which meant some actual keys. I had been looking online at the different keys that existed, and most of them were quite pricey to get shipped to Denmark, so I went thrifting for some old keyboard with some useable keys to start out with. What I came across was an old Dell AT-104W, with ALPS black keys, which are similar to a modern-day Cherry MX Green, except they take a ton of force to push down, and they are noisy as all hell, which is fun.
The Typenstein Monster
After I had acquired the keys for the keyboard, I still needed the board part, and some electrical guts. For the board I was thinking of having it manufactured, but that proved to be way to expensive. Instead I made the cheap DIY solution and bought an acrylic board. The board with all the tools I needed turned out to be cheaper than a premade board from a manufacturer, but let me tell you. It isn’t faster. I had to cut out 86 holes for the keys in the board with a jewelers saw, and for each hole, I had to drill four holes to fit the saw in. On top of that, every time I needed to cut a new hole, I had to remove the saw blade by disassembling the saw!
Living On The Grid
Once the board was assembled, came the real agonizing part. This was to be done perfectly pretty good, so I naturally wanted n-key rollover on the keyboard. This means I can hold down any number of keys on the keyboard, and they will all register correctly. This was a problem – and still is – with older keyboard, where if you hold down too many buttons, the keyboard just receives garbage. Counter measures are usually taken, so that only two or three keys can be registered at once. That though was not enough for me. To achieve this, I has to address the problem of the garbage input, which is short circuiting when too many keys are on. To prevent that from happening, you need to block electricity from running in the wrong direction between the keys. The keys are not connected one by one, but through a matrix, which tests one row of keys for input at a time. This meant I had to solder a diode on every key on the board, and then solder all the keys onto a grid of wires (no, that does not look pretty).
How many MHz Is Your Keyboard?
All this wiring needed to be connected to some controller of course. Otherwise the keyboard isn’t very useful. After researching my options, I went with the only one which could fit in my keyboard, which I also even remotely understood how to use. The choice fell on the Teensy 2.0, an ARM micro controller running at 72 MHz. This board had a dual purpose micro usb, which was very neat, as I could both program the board, and connect it, through the same usb cable.
Then came the coding, which took me way longer time than I’d like to admit. In my defense i was very new at programming at the time, and I have later made a revision, which is some 100 lines shorter than the original. Before I made the full keyboard I needed to do countless tests to teach myself how to read values from a matrix duplex input system, which was a fun, albeit, difficult task. Never have I encountered so many unexplainable errors.

In the end I got the keyboard connected, and flashed the production code onto the device. Seeing the keyboard work for the first time, and actually using it to navigate a computer, was a fantastic feeling I will never forget. Even though the first few times I managed to force a blue screen with ~1000 keystrokes per second due to some ‘interesting’ code I wrote. 3.5 years later I am still using the same keyboard to write this article, so I’d say it was a success. Here it is, in all its home-brewed glory.
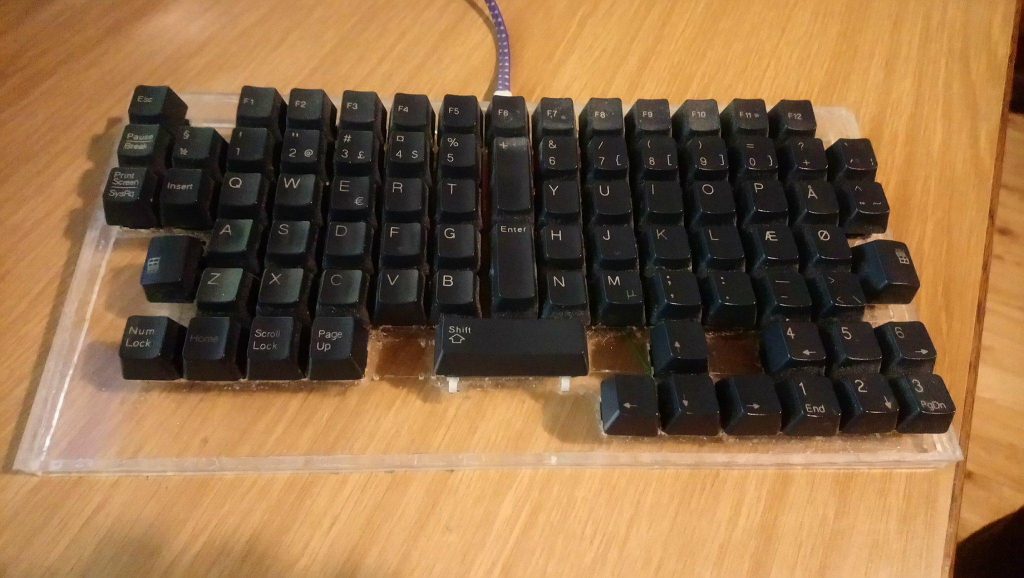
But the x key on the keyboard still wont work half the time, so it’s basically broken.
0 Comments